Building Web Applications with Node.js using MVC Architecture.

As we start our development with small learning projects and implement them by watching tutorials, we often don't give importance to the neatness of our code files. While building small applications, it might be beneficial to keep things simple in one file/folder, but writing code for large-scale applications requires better organization. Writing the backend can be a tedious job, and one mistake can cause the project to collapse. Therefore, it's important to structure our files in a way that makes it easier to navigate and understand the code.

Why keep code files in an organized manner?
I recently experienced an issue while working on an e-commerce website where I was implementing cookie-based authentication. I made a small mistake that didn't cause any crashes in the application, so I continued working on the project. However, while testing the website later, I encountered an error and became frustrated trying to locate the cause of the issue. After thoroughly reviewing my code, I discovered that I had made a spelling mistake in one of my logic function. This incident highlighted the importance of paying attention to details and maintaining the neatness of my code to prevent issues like this from occurring.
MVC Architecture...
In the software development world, you heard this word quite frequently. If you haven't don't worry, this is not any complex methodology. It is just a simple way to organize your code files. It divides application into three main groups - Model, View, and Controller. So by using this method
Reusing code and parallel programming is possible.
partitioning the application in such a way helps developers with future updates and features.
It makes it convenient for developers to come back to their code and understand things.
Model
We can say the model is the Structure. In the model, we design a schema for all the entities. It determines what information about the entity we are going to hold in the database.
After a client request, the controller cannot get data from the database directly, they do it via model. The model does not tell what data is stored in the database it only shows how it is stored.
View
The view is part of the user interface. We can say this is where end-users interact. In simple words, this is where all template files go. View requests information from the server and after getting a response it shows to the end-user.
Controller
The controller manages all the business logic of the application. It interacts with the model to get data from the database. A controller cannot access data from the database directly as we discussed before.
Setting up the project
Initialization and package Installation
To understand how to structure our project, we will set up a basic backend for a web application.
Open the folder in Visual Studio Code where you want to work on your backend.
Once the folder is open, open a terminal by going to the Terminal tab in the top menu and selecting "New Terminal" or by using the shortcut Ctrl + Shift + `.
In the terminal, run the following commands that you need to set up your backend.
1) Initializing the backend application
npm init -y
This will create a package.json file that contains information about the project. We used -y to skip questions.
2) Installing dependencies
npm install mongoose express dotenv morgan validator
Express is a JavaScript framework that is going to make our backend journey smoother.
mongoose is an ODM, simply putting it we use mongoose to communicate with a database.
morgan is an HTTP request logger middleware
2.1) installing dev dependencies
npm install nodemon -D- nodemon helps developers automatically restart the node application
File Structure
1) Create a starting point for the application.
create files index.js and app.js.
touch index.js app.js
2) Create a folder structure
as MVC names first we need 3 folders**models**, views, controllersalong with this, we needconfig, middleware, routes
mkdir models views controllers config middleware routes
we also need.gitignore and .env files
touch .gitignore .env
Finally! we are done with file and folder structure...your project structure will look like this.
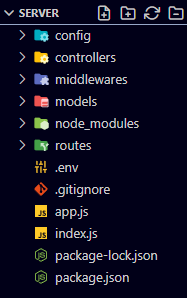
I use git bash to run these commands if you are not familiar with git bash make folder structure manually.
Code Walkthrough
Create Basic express app.
First, initialize express in app.js then export it.
app.js
const express = require('express')
const app = express();

//export app.js
module.exports = app;
as we discussed earlier, index.js is responsible for starting the application. Import the app (express app) in index.js and create a basic server.
index.js
const app = require('./app') //importing app

require('dotenv').config();

//creating basic server
app.listen(process.env.PORT, ()=>{
    console.log(`server is running at port: ${process.env.PORT}`);
})
process.env.PORT retrieves the PORT number from the .env file. Using environment variables in such a way can be useful for setting configuration options that can be changed without modifying the code, such as the port number or database connection details.
Add PORT = 3000 into the .env file**.env**
PORT = 3000
User Controller and routes
1) Creating the controller
Create a new file named HomeController.js in the controllers folder. In this, write a basic test controller
controllers/HomeController.js
exports.home = (req, res) => {
    res.status(200).json({
        success: true,
        greeting: "Home controller working OK",
    });
};
In this controller, we are exporting a function called home that sends a response to the client with a success message and a status code of 200. This function is being exported so that it can be used in the routes to handle incoming requests on the specified path.
2) Creating routes
Create a new file named HomeRoute.js into routes. First, import HomeController into HomeRoute and then specify the routes function.
routes/HomeRoute.js
const express = require('express')

//import homeController
const { home } = require('../controllers/HomeController')
const router = express.Router(); // New router instance from express library

//routes
router.route("/").get(home)

module.exports = router
here we are setting up an Express router and defining a route for incoming HTTP GET requests to the root path ("/"). When a client sends a GET request to this path, the router will use the home function from the HomeController to handle the request and send a response back to the client.
3) Importing routes into app.js
To use routes which we defined into HomeRoutes.js we need to import them into app.js and use them as router middleware. This will allow the routes to handle incoming requests and send responses to the client.
we don't bring controllers into the app.js as we already did that into routes.
app.js
// import all the routes here
const home = require('./routes/HomeRoute')

// router middleware
app.use('/api/v1', home)
Adding Middlewares
app.js
var morgan = require('morgan')
// morgan middleware
app.use(morgan('tiny'))

// regular middlewares
app.use(express.json());
app.use(express.urlencoded({extended: true}))
your app.js will look like this
const express = require('express')
const app = express();
var morgan = require('morgan')

// morgan middleware
app.use(morgan('tiny'))

// regular middlewares
app.use(express.json());
app.use(express.urlencoded({extended: true}))

// import all the routes here
const home = require('./routes/HomeRoute')

// router middleware
app.use('/api/v1', home)

//export app.js
module.exports = app;
Using versioning for your APIs can be a useful way to manage changes and updates to your application's backend. Specifying a version number in the route, such as /api/v1, you can easily upgrade to a new version (e.g. /api/v2) without breaking existing clients that rely on the old version from one place.
Configure package.json
Let's make changes to package.json. scripts that can be run from the command line using the npm run command. Change scripts to
"scripts": {
    "start": "node index.js",
    "dev": "nodemon index.js"
  },
Now test whether our server is running or not using commands such as npm run start or npm run dev .For that open terminal and run the following command
npm run dev
If you did everything neatly and carefully server will start at your assigned port number.
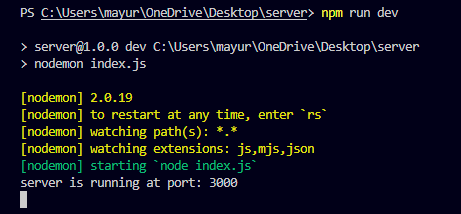
Now let's test whether our route is working fine or not.
Our server is running at port 3000 so our route is going to be http://localhost:3000/api/v1. In the HomeRoutes file, we declared path '/' as the default home route to get a response.

If you are getting a response like this, congratulations on completing 1st level. 🏆
Database Integration
Let's connect the application to the database.
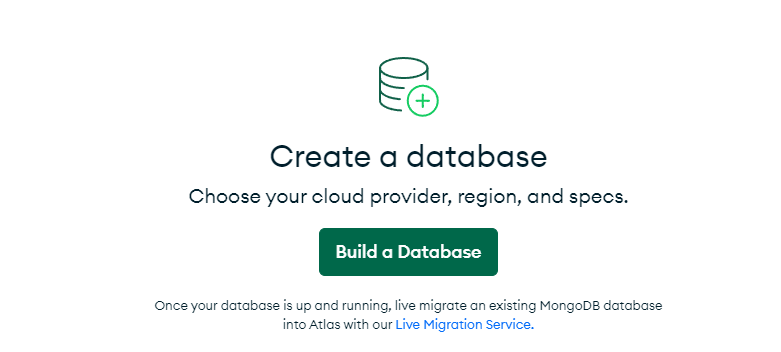
1) Setting up MongoDB atlas
Go to MongoDB to create an account or sign in to your existing account and then create a project.

2) Build a database
3) Deployment option

4) Configure credentials
set username password and IP address(Add my current IP address) and create it. it will take some time.
5) Connect the Cluster to the application

after the cluster and database have been created. Click on connect. Select 'connect your application' as a connection method.
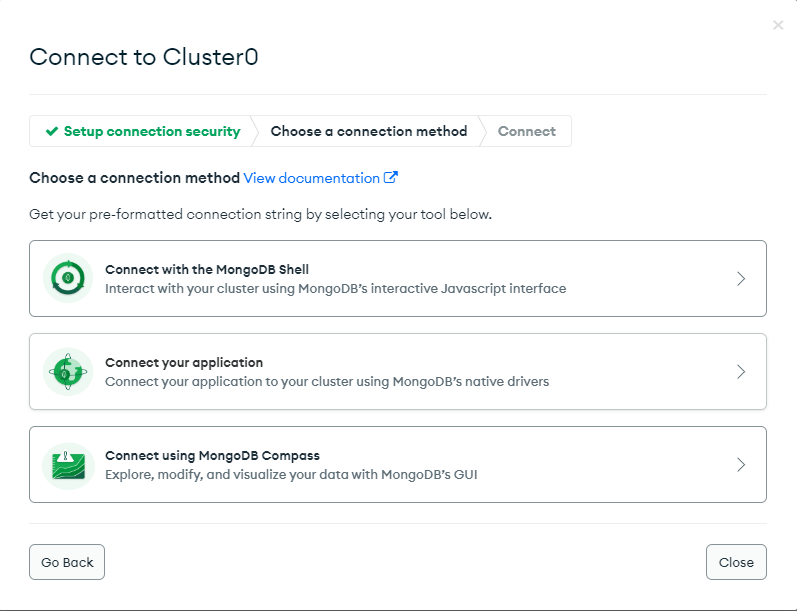
6) Connection method and connection String
keep everything as it is and copy the connection string we need that string to connect our node application to MongoDB

paste connection string into the .env file as
MONGO_URL = mongodb+srv://mayurargade:<password>@cluster0.ovmy0su.mongodb.net/?retryWrites=true&w=majority
replace <password> with your generated password.
7) Database connection logic
Now let's write some code to connect the database. Create a new file in the config folder named connectdb.js and add this piece of code.
config/connectdb.js
const mongoose = require('mongoose') // imports the Mongoose library

const connectdb = () => {
    mongoose.set('strictQuery',false);
    // establishing connection to the database using mongoose.connect
    mongoose.connect(process.env.MONGO_URL, {
        useNewUrlParser: true,
        useUnifiedTopology: true,
    })
    .then(console.log("DB connection succesfull.."))
    .catch(error=> {
        console.log("DB connection failed");
        console.log(error);
        process.exit(1)
    })

}

module.exports =connectdb
8) Import database method
Import connectdb method into index.js. Your index.js will look like this.index.js
const app = require('./app')
const connectdb = require('./config/connectdb');

require('dotenv').config();

// connection with database
connectdb();

//creating basic server
app.listen(process.env.PORT, ()=>{
    console.log(`server is running at port: ${process.env.PORT}`);
})
congratulations you have completed your 2nd level.🏆
Creating a Model and User Schema.
We have discussed a lot about model and user schema so directly let's get into the code part. Create User.js in the models folder. Let's define a schema in
model/User.js
const mongoose = require('mongoose');
const validator = require('validator');

const userSchema = new mongoose.Schema({
  name:{
        type: String,
        required: [true, 'please provide a name'],
        maxLength: [40, 'name should be under 40 characters'],
    },
    email:{
        type: String,
        required: [true, 'please provide a email'],
        validate: [validator.isEmail, 'please enter email in correct format'],
        unique: true,
    }
 });

module.exports = mongoose.model('User', userSchema)
We imported the mongoose and Validator packages in user.js and created a user Schema with the help of mongoose. and at the end, exported the user Schema.
User Controller and Rest API
1. Create a Controller
We want to send data to the database, let's write the logic for that. The logic part always comes in a controller. Create a new file UserController.js in controllers folder.
controllers/UserController.js
const User = require('../models/user')

exports.post = ("/register", async(req, res) => {
    try {
        const {name, email} = req.body;

        const user = await User.create({
                name,
                email
        });
        res.status(200).json(user);

    } catch (error) {
        console.log(error);
    }
})
Here we are creating a user with a name and email and then sending the user and status 200 as a success. If anything goes wrong then the console logs the error. Now just like before create a new route file and then import UserController into it.
2. Create UserRoute.js into the routes folder.
routes/UserRoute.js
const express = require('express')
const router = express.Router()

const {post } = require('../controllers/UserController')

router.route('/signup').post(post)

module.exports = router;
3. Import routes into app.js and write router middlewares.
const user = require('./routes/UserRoute')
app.use('/api/v1', user)
your app.js will look like this.
app.js
const express = require('express')
const app = express();

var morgan = require('morgan')
// morgan middleware
app.use(morgan('tiny'))

// regular middlewares
app.use(express.json());
app.use(express.urlencoded({extended: true}))

// import all the routes here
const home = require('./routes/HomeRoute')
const user = require('./routes/UserRoute')
// router middleware
app.use('/api/v1', home)
app.use('/api/v1', user)

//export app.js
module.exports = app;
Integrating template Engine EJS
Till now we are done with the Model and controller now let's look into the views part.
1) Install package ejs
npm install ejs
2) Create ejs file.
Create a file called 'signuptest.ejs' in the 'views' directory and add the following test form code to the file. This is just a simple HTML code that can be used to test the controllers and routes in your application.
<!DOCTYPE html>

<html lang="en">
<head>
    <meta charset="UTF-8">
    <meta http-equiv="X-UA-Compatible" content="IE=edge">
    <meta name="viewport" content="width=device-width, initial-scale=1.0">
    <!-- CSS only -->
<link href="https://cdn.jsdelivr.net/npm/bootstrap@5.1.3/dist/css/bootstrap.min.css" rel="stylesheet" integrity="sha384-1BmE4kWBq78iYhFldvKuhfTAU6auU8tT94WrHftjDbrCEXSU1oBoqyl2QvZ6jIW3" crossorigin="anonymous">
    <title>TEST FORM</title>
</head>
<body class="">
    <div class="container mt-4 col-4 col-offset-6">
        <h1 class="display-3">EVENT FORM</h1>
        <form method="post" action="/api/v1/signup" enctype="form-data">

            <div class="mb-3">
              <label for="name" class="form-label">name</label>
              <input type="text" name="name" class="form-control" id="name" aria-describedby="emailHelp">
            </div>

            <div class="mb-3">
              <label for="email" class="form-label">email</label>
              <input type="email" name="email" class="form-control" id="email" aria-describedby="emailHelp">
            </div>

            <button type="submit" class="btn btn-primary">Submit</button>

        </form>

    </div>
</body>
</html>
3) import ejs into app.js
Import ejs into app.js and create a sample route to render this form.
// temp check (setting up ejs as a render engine)
app.set("view engine", "ejs")

// test route
app.get('/signuptest', (req, res) => {
    res.render('signuptest')
})
sets up the EJS (Embedded JavaScript) template engine as the default render engine for an Express.js application and defines a route for an incoming GET request to the /signuptest path.
After adding these lines of code your app.js will look like this
const express = require('express')
const app = express();
var morgan = require('morgan')

// morgan middleware
app.use(morgan('tiny'))

// regular middlewares
app.use(express.json());
app.use(express.urlencoded({extended: true}))

// temp check (setting up ejs as a render engine)
app.set("view engine", "ejs")

// test route
app.get('/signuptest', (req, res) => {
    res.render('signuptest')
})

// import all the routes here
const home = require('./routes/HomeRoute')
const user = require('./routes/UserRoute')

// router middleware
app.use('/api/v1', home)
app.use('/api/v1', user)

//export app.js
module.exports = app;
Let's now test our 1st web backend which we built using the MVC design pattern.
Testing Application.
go to your browser and navigate to this URL.
http://localhost:3000/signuptest
the local machine localhost on port 3000. The route is specified by the path /signuptest, which is appended to the base URL of the server.

fill all the fields, cross your fingers and hit submit.
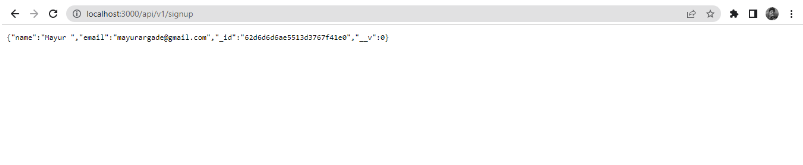
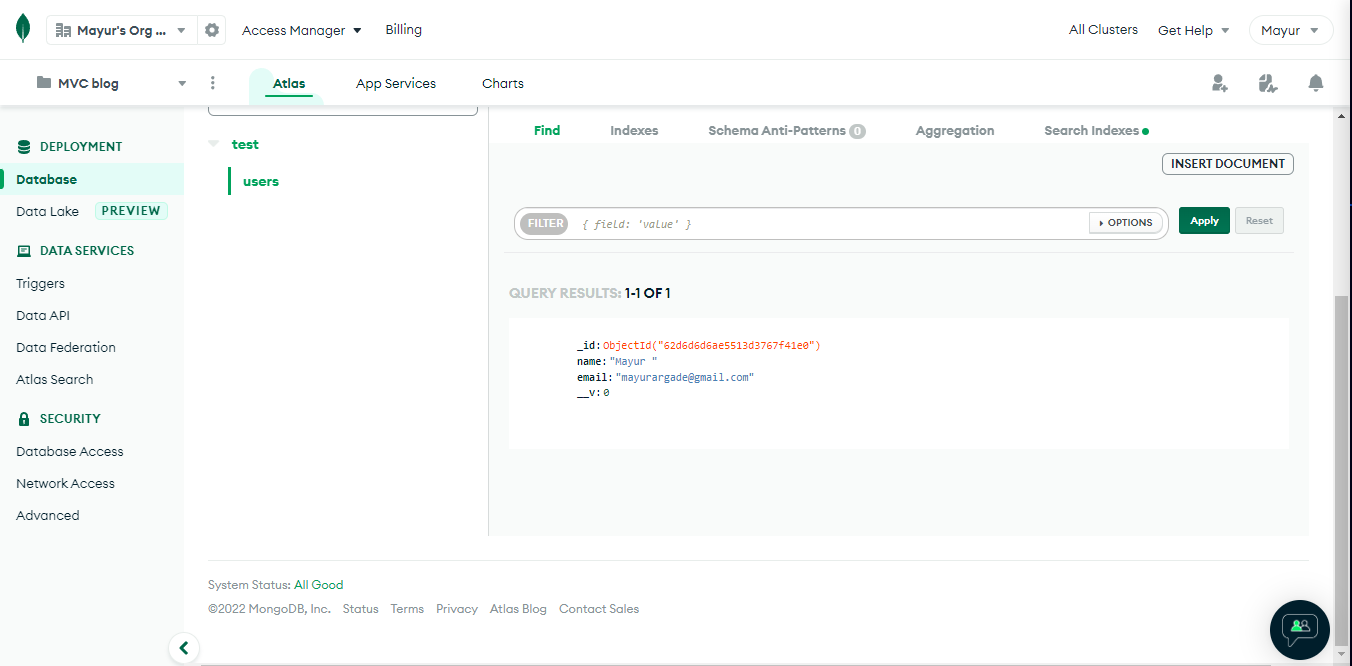
If you are getting response like this then congrats you did it. Your user has been created into your database. check your database collections.
You Finally completed all levels and created a basic server code using MVC design pattern.
Conclusion
It's important to note that this is just one way to implement MVC in a Node.js application, and there are many variations of this approach. The key is to find a structure that works for your project and helps you build a scalable, maintainable application.
Happy Coding !! 👍🏻👋🏻